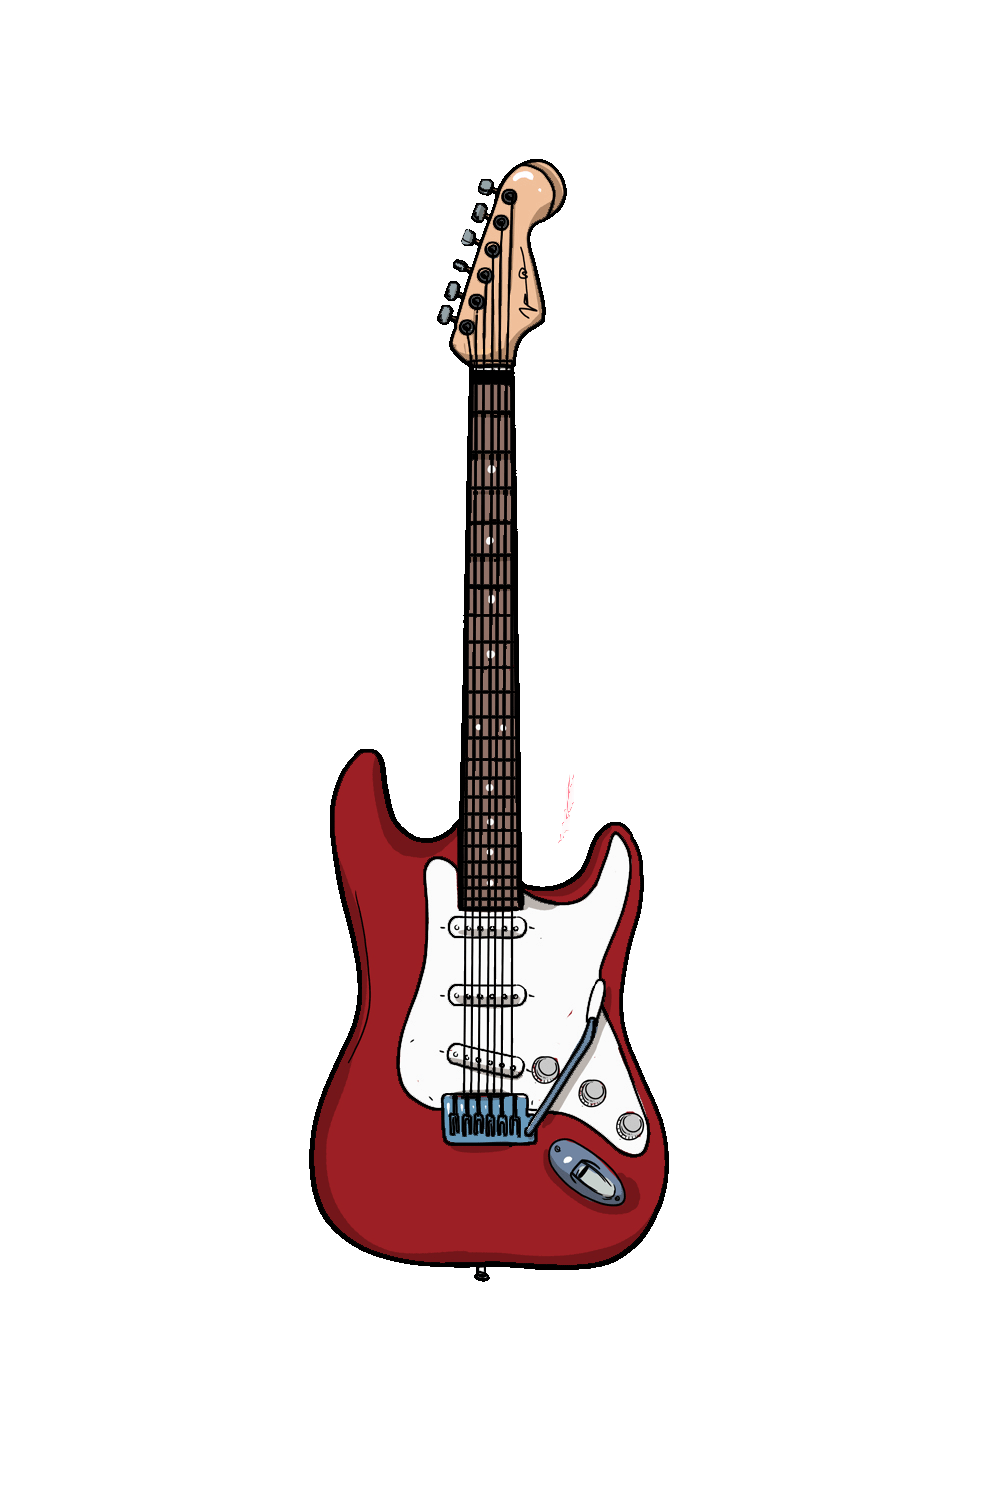
Electric Guitar
Everyone loves music, and there are countless such sorts to browse. Music can be made in various ways utilizing various instruments and devices. The electric guitar is quite possibly the most well-known instrument, and keeping in mind that it’s likely generally connected with rock, an electric guitar can be utilized in basically any kind of music. Electric guitar & cute smurf drawing or other drawing tutorials live on cool drawing idea site.
They can make a wide range of tones and sounds, and they come in every kind of shapes and sizes too. Figuring out how to draw an electric guitar can be an extraordinary method for shaking out from the solace of your number one seat!
From that point forward, we likewise have a couple of ideas on options for the foundation that you can add. With everything that expressed, we’re prepared to shake on with the first of these six stages we have for you! Snatch your #1 workmanship apparatuses, put on some shaking tunes and how about we begin.
Stage 1 – Electric Guitar Drawing
Before we start this aide, there are maybe one or two instruments we would suggest having available before you begin drawing. These would incorporate the usuals, like different pens or pencils.
We would likewise exceptionally propose having a ruler close by, or if nothing else something entirely straight that you can follow with.
This is on the grounds that there will be heaps of straight lines for subtleties like the neck, worries and the strings.
With that far removed, we will begin drawing the layout of the guitar’s body. A guitar’s body can come in a wide range of shapes, however the one we are drawing has a genuinely standard shape.
It has two adjusted horns of sorts, and this permits the player’s hands to go higher on the neck to arrive at higher notes. The body of the guitar will be a solitary wavy line, and it can take a consistent hand.
One way that you can make this more straightforward is to draw a harsh form of the shape with a pencil. Assuming you have a light pencil, that would be great, any other way you can utilize your normal pencil and press delicately.
The horn on the left half of the guitar will be a piece taller, and it will stretch out down in a line that bends in and afterward out once more. This will bring about a more extensive base for the guitar’s body.
You will broaden the wavy line back up from the base to ultimately frame the horn on the right, which will be somewhat lower than the other.
Make certain to leave a space at the middle, as the neck will go there soon.
Stage 2: Draw the neck of the guitar
Each guitar needs a neck, and that is the very thing that we will include this step of the aide. Drawing the neck without some sort of hardware to help you would be very precarious.
That is on the grounds that we in a perfect world believe that the neck should be totally straight, which can be hard when you need to define longer boundaries. That is the reason we prescribed utilizing a ruler to help you.
You could likewise utilize any straight-edged object you might have lying around to fill in as a shoddy ruler on the off chance that you don’t approach one at the present time.
Anyway you wind up making it happen, we are prepared to begin drawing the neck now. It will basically be a long, slight rectangular shape.
As you will find in the reference picture, it will be very marginally more extensive at the base and will get somewhat more tight the higher you get.
It will likewise opening into the space at the focal point of the body that we left beforehand.
We would recommend beginning with the upward lines of the neck that will contact the two sides of that unfilled space. Then, interface them at the base with an even line.
At the top, we will add a line and afterward another actually intently under it. There’s no particular length for the neck, however attempt to make it genuinely lengthy.
We will continue to add subtleties as we continue, so how about we head on to stage 3!
Stage 3: Add the top of the electric guitar and a few more modest subtleties
We will add a great deal in this step of our aide on the most proficient method to draw an electric guitar, so we will separate it into more modest components! To begin with, we will draw the top of the electric guitar.
This goes at the actual top of the neck, and it has a somewhat surprising shape. The left side will be drawn with a genuinely straight line that points somewhat to one side.
The highest point of the head will be an adjusted line that points to one side. Then, at that point, the right half of the head will have a more rakish line to it.
It can sound a piece confounded when worked out that way, however it will be simpler assuming that you allude to the reference picture as you draw! Then, we will add the tuners to the head.
These will begin with a line of little circles on the left half of the head. What’s more, every one will have a more modest circle within it. Then, at that point, you can add the actual tuners.
These will be little square shapes on the external edge of the head, and every one will agree with one of the little circles you added already.
At long last for this step, we will draw the pickups. These go on the body of the guitar, and they will be a few long, dainty adjusted shapes.
The initial two will be straight, while the third one will be drawn at a point. Add a few little dabs inside every one, and afterward polish off with two little round handles close to the pickup on the base.
Stage 4: Presently draw a few more modest subtleties
Yet again there are parcels more subtleties to include this fourth step, however we will separate it. How about we start with a portion of the more minor subtleties on the top of the guitar. We will begin with a bended line on the upper right-hand side of the head. Numerous guitar causes will to have a mark imprinted on the head, and you can draw one on this one.
We kept it ambiguous, yet you can make it match your #1 guitar producer or make your own. The following part could take a touch of persistence, and you would be best off utilizing a ruler again for this part.
We will draw the frets of the guitar on the neck, and these will be a progression of straight lines across the neck. Similar as on a genuine electric guitar, the frets will get increasingly close to each other the further down you go.
Then, we have an additional subtleties to draw on the body of the electric guitar. This part will copy the overall wavy layout of the guitar body inside and encompass the pickups we drew before. It’s a section we would suggest concentrating on intently on the reference picture to perceive how it ought to look.
We then, at that point, have a couple of additional subtleties to add beneath this segment, including a switch and another handle. When your electric guitar is seeming to be the one in the reference picture, you can continue on toward stage 5 where we will draw a few last subtleties, contacts and thoughts.
Stage 5: Draw the last subtleties for your electric guitar
This fifth piece of your electric guitar drawing will be centered around the last subtleties of this electric guitar. A portion of these will be ones you will find in the reference picture, and others will be subtleties you can add yourself.
For the time being, we will draw the strings of the guitar. These may appear to be basic, yet it could end up being one of the fiddliest pieces of the plan up until this point.
You’ll be utilized to us expressing this at this point, yet you ought to think about involving a ruler for this part. Each string will stretch out down from one of the little circles on the top of the guitar and down the neck.
Assuming that done well, they ought to be in every way uniformly dispersed and meet at a similar point at the foundation of the neck. This will make a fine lattice design on the neck too.
At long last, add a straightforward bended line on the inward diagram of the guitar body. Whenever you have added these last contacts, you could add your very own few thoughts!
Guitars will frequently have various examples and plans on them, and you can add a few cool subtleties. For one thought, a few guitars will have fire decals on them to make a searing look!
Others might have explicit marking or stickers. You could likewise attract a foundation to show where this electric guitar is being played, and you could show other gear too.
These are only a couple of thoughts, however you could add some other tomfoolery subtleties and options that you need.
Stage 6: Presently, polish off with some tone for this electric guitar
We utilized an exemplary variety plot for this rendition of the electric guitar, however this is one of the practically boundless ways that you can approach shading this guitar.
We utilized a red and white variety conspire for the body of the electric guitar, and it’s a striking look for sure. Then, at that point, we involved basic browns for the neck and head with some silver for any metallic parts.
Presently it depends on you to choose how to variety your own plan, in any case! You could go for a comparable variety plan to our model, or you could go for completely interesting varieties.
While shading, the varieties you pick are by all accounts not the only viewpoint to focus on. You can likewise play around with the workmanship devices and mediums that you use for the varieties. Hued pens and markers can be perfect for a few more splendid varieties, though shaded pencils and watercolors can turn out better for lighter tones.
Also Read bcc